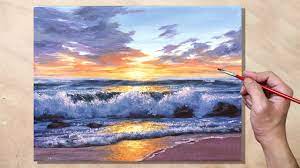
How to paint a sunset with acrylics – Sunsets are magical moments that inspire awe with their vibrant colors and breathtaking scenery. As an artist, capturing the essence of a sunset on canvas can be a rewarding and fulfilling experience. Acrylic sunset paintings may capture the distinct splendor of one of nature’s most dramatic sceneries. Acrylic paints, which are vibrant and fast-drying, can bring the evening sky to life, creating a stunning set piece for your house. enough info

Every sunset is unique, and they seem different at different times of the year. Autumn and winter sunsets are especially beautiful, with blazing colors and bright rays breaking through the clouds. You’re bound to become a sunset watcher after attempting sunset painting.
Using acrylic paint might be intimidating at first, especially when it comes to elements like clouds or reflections over water. In this article, we will guide you through the step-by-step process of painting a stunning sunset using acrylic paints. So, let’s gather our materials and unleash our creativity to bring the beauty of the setting sun to life!
Read Also: AI-generated Art and NFTs Technology (All You Need to Know)
Materials Needed:
- Acrylic paints (primary colors, plus warm tones like red, orange, yellow, and cool tones like blue, and purple)
- Canvas or canvas board
- Assorted paintbrushes (flat, round, and fan brushes)
- Palette or palette paper
- Water container for rinsing brushes
- Paper towels or cloth for wiping brushes
- Palette knife (optional, for blending and texture)
- Easel or a flat surface to hold the canvas
- Reference photo of a sunset (for inspiration)
Step-by-Step Guide on How to Paint a Sunset with Acrylics:
Step 1: Set up your workspace
Choose a well-lit and comfortable area to paint. Protect your working surface with a tablecloth or newspaper. Set up your easel or secure your canvas on a flat surface, ensuring it is at a comfortable height for painting.
Step 2: Prepare your colors
Squeeze out the primary colors, red, yellow, and blue, onto your palette. Then, mix warm colors like red, orange, and yellow for the vibrant sunset hues. Additionally, prepare cool colors like blue and purple for contrasting shades. Remember to have a good range of light, medium, and dark tones.
Step 3: Sketch the basic outline
Using a light pencil or a thin brush dipped in light-colored paint, lightly sketch the basic outline of your desired landscape. Indicate the horizon line, any elements like trees or mountains, and the general placement of the sun.
Read Also: How to clean a laptop screen(A Step-by-Step Guide)
Step 4: Paint the sky
Starting from the top of the canvas, use a large flat brush to apply the sky colors. Begin with lighter tones near the horizon and gradually transition to darker tones as you move upward. Blend the colors together using horizontal or circular brushstrokes to create a smooth gradient effect.
Step 5: Add the sunset colors
Now, focus on the area where the sun will be placed. Use a round brush or a palette knife to apply bold strokes of warm colors like oranges, reds, and yellows. Layer the colors, allowing them to blend naturally and create a sense of depth and radiance. Don’t be afraid to experiment with different brushstrokes to capture the essence of the sunset.
Step 6: Paint the landscape:
Once the sky and sunset colors are in place, turn your attention to the landscape elements. Use various brushes to depict trees, mountains, or any other features in your reference photo. Layer the paint to create depth and texture. Remember to use cooler tones for elements in the distance to create the illusion of atmospheric perspective.
Step 7: Refine details and highlights
After the initial layers have dried, add finer details to your painting. Use smaller brushes or a palette knife to add texture, highlights, and intricate features such as the sun’s rays or the silhouette of trees. Pay attention to the interplay of light and shadow, enhancing the three-dimensional quality of your artwork.
Read Also: How AI and Nanotechnology Work Together
Step 8: Step back and assess
Take a step back and evaluate your painting. Look for any areas that may need refinement or adjustments. Make necessary corrections and add final touches to achieve the desired effect.
Step 9: Let it dry and protect your artwork
Allow your painting to dry completely before handling or storing it. Once dry, you can apply a protective varnish to preserve and enhance the longevity of your artwork. Follow the instructions on the varnish bottle for proper application. How To Paint A Sunset With Acrylics
Step 10: Appreciate and share your masterpiece
Once your painting is fully dry and varnished, take a moment to appreciate your creation. Admire the colors, textures, and emotions your artwork evokes. Share your masterpiece with others, whether it’s by displaying it in your home, sharing it on social media, or participating in local art exhibitions.
Read Also: Senior Java Developer Job Description
Tips for painting an acrylic sunset
It can take some time to become used to acrylic paints if you’ve never used them before, but it’s well worth the effort! Begin with these professional suggestions…
1. Acrylics dry quite quickly:
Blending with this style of paint can be challenging. By painting in many layers, you may work with this element of the paint rather than against it.
2. On your palette, blend, then combine colors:
After blending two regions of color, just merge them on your palette and use that hue to blend between them again. This is quite useful for painting things such as clouds.
3. Begin with the lightest colors:
If you want a bright region, your foundation layer should be bright as well. Remember this when painting the sun, the brightest star in any sunset painting!
Read Also: How To Be A Successful Entrepreneur (The Ultimate Guide)
Tips for Success:
- Start with a light background: Begin with a light-colored base for your canvas to allow the sunset colors to pop and blend smoothly.
- Experiment with layering: Acrylic paints dry quickly, allowing you to layer colors and create depth. Experiment with transparent and opaque layers to achieve the desired effects.
- Use reference photos: Study and analyze reference photos of sunsets to understand the color variations and atmospheric conditions.
- Blend with wet-on-wet technique: To achieve a seamless blend, work with wet paint and blend colors together using soft brushstrokes or a palette knife.
- Practice brush control: Vary your brushstrokes to create different textures and effects. Use broad strokes for the sky and sun, and finer details for landscape elements.
- Embrace creativity: While a reference photo can be helpful, don’t be afraid to add your artistic interpretation and make the painting your own.
Read Also: How To Use A Jump Starter (Step by Step)
FAQs & Answers
1, Do I need prior painting experience to create an acrylic sunset?
No, prior painting experience is not required to paint a sunset with acrylics. This step-by-step tutorial is intended to assist novices in creating a lovely sunset painting. It’s a fantastic opportunity to learn and experiment with acrylic painting techniques.
2, Can I use multiple acrylic paint colors for the sunset?
Yes, you may add depth and variation to your sunset by using several colors of acrylic paint. Experimenting with warm colors like as reds, oranges, and yellows, as well as cold tones such as blues and purples, can aid in creating a more dynamic and realistic picture of the sunset.
3, What size brushes should I use when painting a sunset?
It’s a good idea to have varied brush sizes for different portions of your painting. Cover larger areas, such as the sky, with larger brushes, such as flat brushes. Smaller round brushes can be utilized for finer strokes and detailing. Having a variety of brush sizes allows you to have greater control and creativity in your painting.
4, How can I make a smooth sky gradient?
Begin with a light color at the horizon and gradually shift to darker tones as you travel upward to produce a smooth gradient in the sky. While the paint is still wet, use horizontal or circular brushstrokes to blend the colors together. You can also smooth any hard lines or edges with a clean, wet brush.
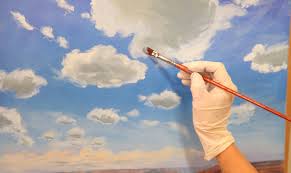
5, Can I add other aspects to my sunset painting, such as clouds or reflections?
Without a doubt! Including extra features such as clouds or reflections can improve the overall composition and realism of your sunset painting. For the clouds, use a lighter color of paint to create soft, fluffy shapes. Incorporate the colors of the sunset into the lake or other reflecting surfaces for reflections.
6, How long does acrylic paint take to dry?
Acrylic paint dries relatively quickly, usually between 10 to 20 minutes, depending on paint thickness and environmental variables. It is crucial to note, however, that heavier layers of paint may take longer to dry. To avoid unintended smearing or blending, let each layer dry fully before adding subsequent layers or details.
7, How can I correct errors or make adjustments to my painting?
Acrylic paint is easily corrected and adjusted. If you make a mistake, wait for the paint to dry before painting over it with the appropriate color. To make modifications or modify details, use a clean, moist brush or a palette knife to gently scrape off or lift the paint.
6, How should I care for and safeguard my acrylic sunset painting?
Once your artwork is totally dried, apply varnish to protect it. Varnishes come in a variety of finishes (gloss, satin, and matte) and act as a barrier against dust, UV rays, and tiny scratches. For optimal application, follow the instructions on the varnish bottle. To remove any dust or debris from your painting, use a soft, dry cloth or a feather duster.
Remember that painting a sunset with acrylics is a creative journey with no defined guidelines. As you capture the beauty of a sunset on canvas, embrace your artistic expression, enjoy the process, and allow your imagination to guide you]
Conclusion
Painting a sunset with acrylics allows you to capture the mesmerizing beauty of this natural phenomenon on canvas. By following the step-by-step guide and allowing your creativity to flourish, you can create stunning artwork that showcases the colors, textures, and emotions of a sunset. Remember to enjoy the process, embrace experimentation, and let your passion guide your brushstrokes. So, gather your materials, let the sunset inspire you, and embark on an artistic journey to create a masterpiece that reflects the awe-inspiring magic of nature’s evening sky.