How to change your AirDrop settings on an iPhone or iPad(The Ultimate Guide): When transferring images and movies between iPhones or between your phone and an iPad, AirDrop can be a very helpful tool. However, it’s less helpful if you unexpectedly receive an AirDrop from a stranger while riding the metro.
Fortunately, you can quickly adjust your AirDrop preferences and restrict who can send you messages. In this ultimate guide, we’ll unravel the mystery and unveil the secrets of changing your AirDrop settings on your iPhone or iPad.
Read Also: How to Take off Parental controls on iPhone (Quick & Easy Guide)
How to change your AirDrop settings on an iPhone or iPad: The Ultimate Guide
Step 1: Navigating to the Control Center
The first step on this enchanting journey involves opening the Control Center on your Apple device. Simply swipe down from the upper-right corner on newer iPhones or iPads, or swipe up from the bottom on older models. Here lies the gateway to your device’s hidden powers.
Read Also: How to convert video to mp3 on iPhone (All you need to know)
Step 2: Locating the AirDrop Icon
Read Also: How to Disconnect iPad from iPhone (Ultimate Guide 2023)
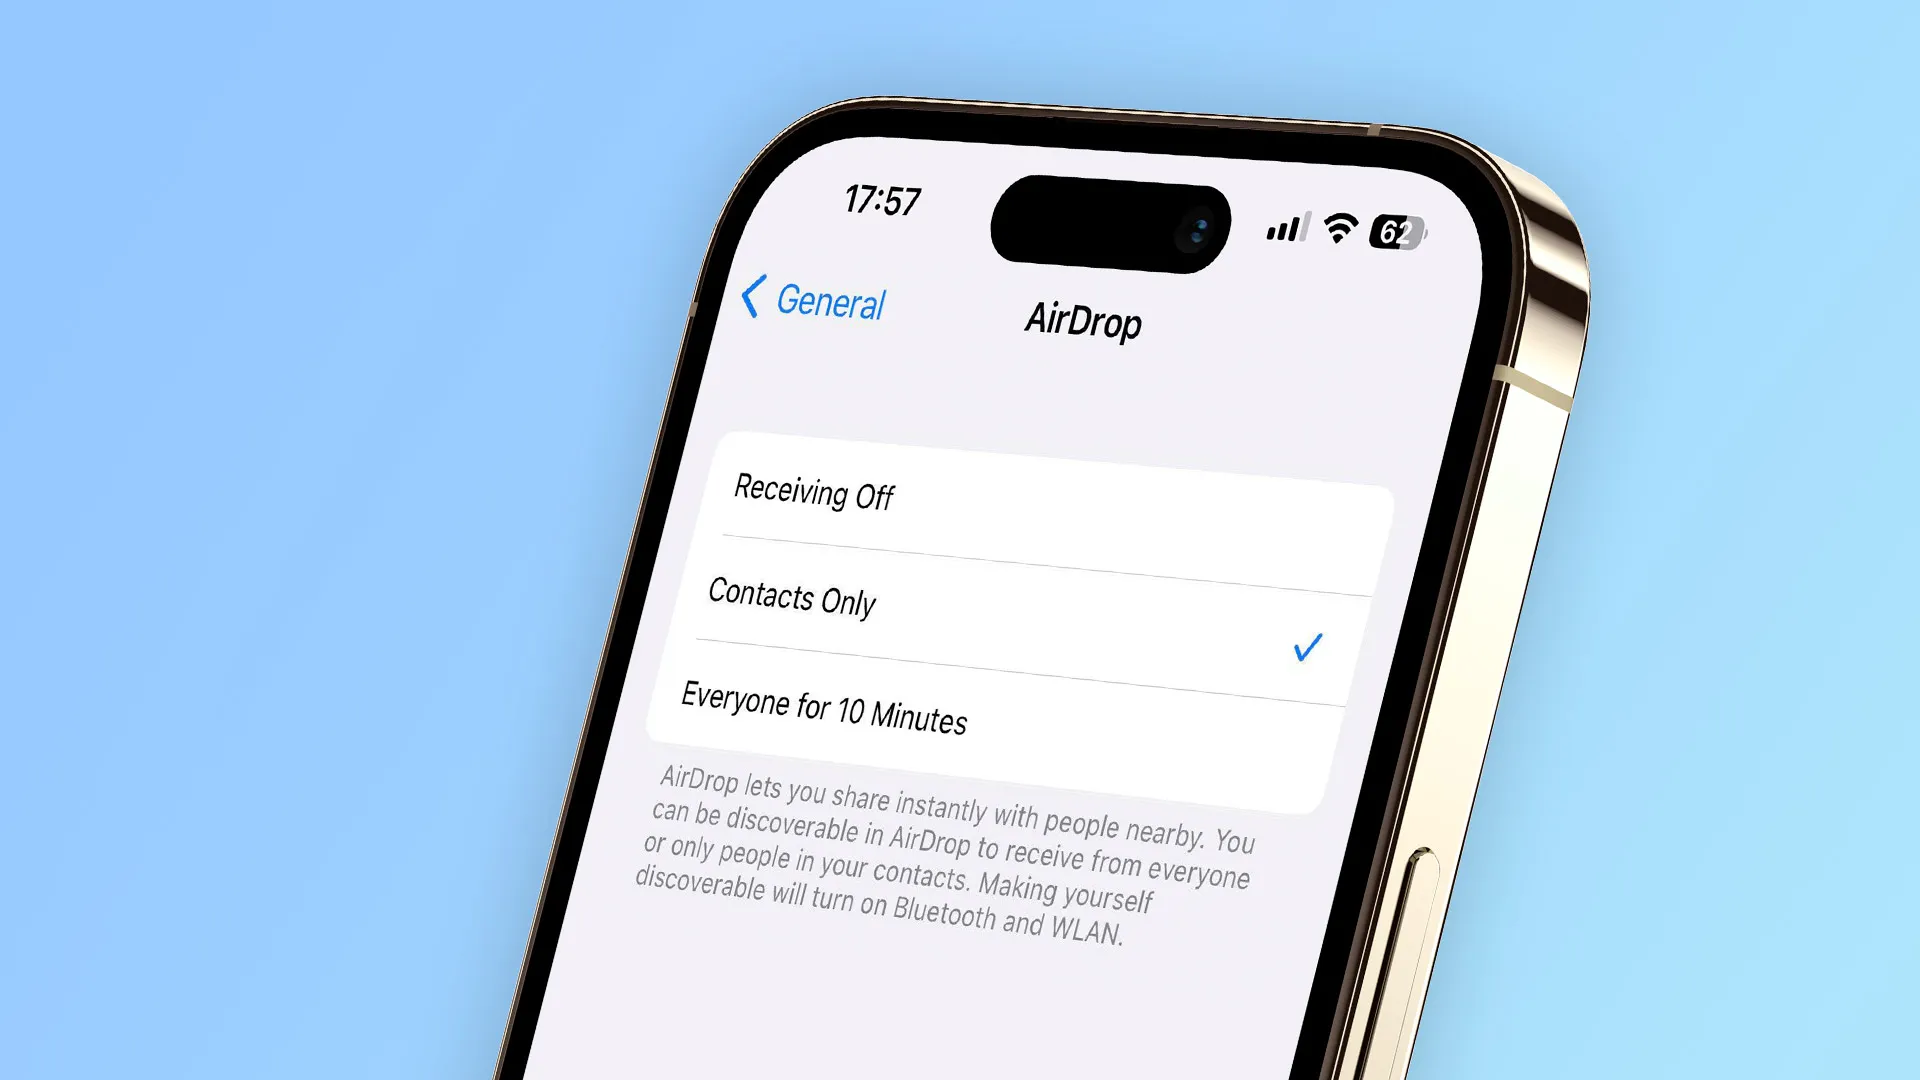
Step 3: Choosing Your Visibility
Now comes the moment of truth – deciding who gets to witness your magical file-sharing prowess. The AirDrop settings provide three visibility options:
- Receiving Off: This cloaks you in a shroud of invisibility, making you impervious to the prying eyes of nearby devices.
- Contacts Only: For those who prefer a more selective audience, this option limits AirDrop access to your contacts. Only those in your inner circle can bask in the glow of your sharing magic.
- Everyone: The boldest choice of them all, this setting opens the floodgates, allowing any nearby Apple device to detect and receive your shared content. It’s a brave new world of connectivity.
Read Also: How To Transfer WhatsApp Messages From Android To iPhone
Step 4: Discovering the Power of “Everyone”
Should you choose the daring “Everyone” option, be prepared for an influx of possibilities. Suddenly, your iPhone or iPad transforms into a beacon of generosity, ready to share with any willing recipient. This setting is ideal for crowded spaces, meetings, or impromptu gatherings where the spirit of sharing knows no bounds.
Read Also: How To Change Font On iPhone
Step 5: Basking in the Glory of Successful Sharing
With your AirDrop settings finely tuned, revel in the joy of seamless sharing. Witness the instantaneous transfer of photos, videos, and files as they dance between devices with unparalleled grace. The magic of AirDrop is now at your fingertips, effortlessly bridging the gap between digital worlds.
Conclusion
Congratulations, You’ve now successfully mastered your way around your iPhone or iPad’s AirDrop settings. You now have the power to decide whether to stay a private sharer or to take the brave route of sharing with “Everyone.” In this wonderful world of Apple’s AirDrop, may your files travel quickly and your connections stay ever-magical.
FAQs & Answers
1. Can I use AirDrop between separate Apple devices, such as an iPhone and an iPad?
Absolutely! AirDrop is intended to enable smooth file sharing across Apple devices. Whether transferring from iPhone to iPad or vice versa, AirDrop’s magic transcends device boundaries to create a truly integrated experience.
2. Can I revert my AirDrop settings to default after making changes?
A6: Certainly! To revert to the default settings, click the AirDrop icon in the Control Center and select your preferred visibility option or disable AirDrop completely. The device will then revert to its original state.
3. Are there any security problems with using the “Everyone” option in AirDrop settings?
While the “Everyone” option opens up the possibility of sharing, caution is required in public places. To reduce the security risks associated with open sharing, accept only data from trusted sources.