How To Create a Gig on Fiverr (A Step By Step Guide): You may find almost any service you can think of on Fiverr, including graphic design, web development, amusing birthday movies, and personalised relationship counsel. Enoughinfo.co
Read Also: How To Create A Website With WordPress
Workers on Fiverr offer their services, which clients can explore and purchase; these are referred to as “gigs.” This is a little different from other freelance platforms.
Fiverr is an online freelancing platform just like SproughtGigs and is worth checking out if you’re thinking about leaving your work, are a skilled person seeking for some side cash, or are already a freelancer looking to expand into new platforms. Both the platform and gig posting are free.

A Step By Step Guide on How To Create a Gig on Fiverr
Let’s examine the Fiverr gig creation procedure in more detail. Yes, it is simple. Almost everyone can accomplish it. However, I’ll show you how to do it correctly. Before you know it, you’ll be having conversations with your first few new clients.
Step 1: Sign Up/Log in and then create an Account
In order to publish your first gig, you must first register for an account. You can register with your email address, Google account, or Facebook account. After selecting your preferred account creation method, you’ll need to select your username and provide a password or email address. After your account has been created, just open your email, click on it, and complete your profile. if you have an account, you can just skip this process.
Read Also: How To Create NFT On Opensea( All You Need To Know)
Step 2: Set up your profile
Make sure your profile fulfils all the requirements in every way possible:
1. Profile Image
Add a professional-looking photo of your face to your profile picture. This will improve the appearance of your profile and help prospective purchasers feel more confident that you are a real person.
2. Description
This part serves as a means of introducing oneself to potential customers. You can mention anything you think is relevant here, such as your experiences or areas of expertise.
3. Languages
Indicate to potential employers what languages you speak and how proficient you are in them. This is particularly crucial if your job requires you to translate or write.
Read Also: How to learn a New Language and be consistent Learning it
4. Skills
List any abilities that are relevant to the gigs you plan to establish here. These consist of skills you’ve acquired from previous employment, pastimes, or other life events. Fiverr only lets ten, so pick carefully.
5. Education
Mention your degrees and the college you attended.
Read Also: How to Curate an Aesthetic Instagram Feed (All you need to know)
6. Certifications
Provide a list of any extra credentials that could make you stand out from the competition.
7. Tests Taken
The tests you’ve finished using Fiverr will be shown in this section of your profile. Tests can boost a potential buyer’s trust while also helping to validate your abilities. You can only take exams twice every three months, so proceed with caution. If you don’t perform well on the test, Fiverr does allow you to conceal your results.
Read Also: How To Get Photography Clients (13 Ways to grow your business)
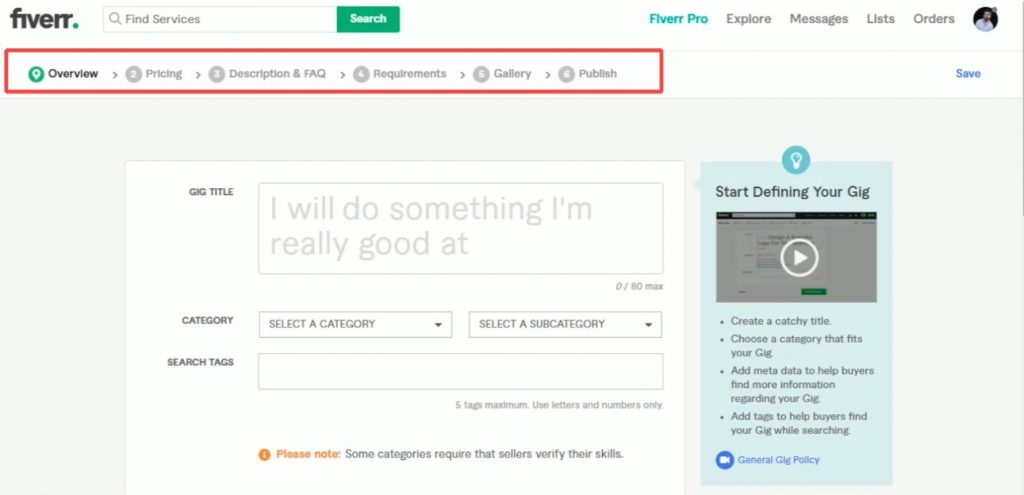
Step 3: Start creating your new Gig
After creating your profile, you can start working on your first gig! To accomplish this, select the “Gigs” option from the drop-down menu under the “Selling” menu at the top of the screen. To initiate the procedure, all you have to do is click the “Create New Gig” button.
Step 4: Select a Category and a Subcategory
Choose the most appropriate category and subcategory for your gig. This makes it easier for potential customers to find your services.
Read Also: How To Be A Better Decision Maker (10 Good Tips)
Step 5: Give Your Gig a Title
Make a concise and captivating title for your gig. To boost search exposure, use terms related to your service.

Step 6: Create a Job Description
Give a thorough and appealing description of your service. Describe your services, your expertise, and what sets you different. Make it obvious to buyers what they may expect.
Step 7: Include Relevant Tags
Choose relevant tags that characterise your performance. Tags make your gig more visible in Fiverr’s search results.
Read Also: Senior Software Engineer Job Description
Step 8: Establish Pricing and Packages
Determine your price structure. You can provide various packages with varied degrees of service. Outline exactly what each package covers.
Step 9: Include Gig Extras
As gig extras, provide additional services. This allows buyers to personalise their orders and gives you the possibility to earn extra money.
Step 10: Schedule Delivery
Indicate how long it will take you to complete the assignment. Consider your workload and be realistic.
Read Also: How to Borrow Money From Palmpay
Step 11: Include Requirements
Define what information or materials you require from the buyer to begin and finish the order. This avoids misunderstandings.
Step 12: Create Gig Photos and Videos
Visuals are essential. Make eye-catching photographs or movies that highlight your work or process. You can upload several photographs and videos to Fiverr.
Read Also: How to make money with your mobile Phone (15 Great ways)
Step 13: Test Your Gig
Before you publish your concert, double-check that all of the facts are correct and enticing. To see how it will seem to potential purchasers, use the preview tool.
Step 14: Publish Your Gig Public
When you’re finished with your gig, click the “Publish Gig” button. Your gig is now live and available for viewing by potential purchasers.

Step 15: Promote Your Gig
Increase your visibility by sharing your gig on social media or other sites. Fiverr also offers tools to help you promote your services on the platform.
Step 16: Manage and Monitor Your Gig
Check your Fiverr account on a regular basis for messages, orders, and updates. To establish a positive reputation, respond to requests immediately and offer high-quality services.
Conclusion
As you can see, mastering the art of creating a gig on Fiverr is not just about listing your services; it’s about strategically presenting your skills to stand out in a competitive marketplace. By following this step-by-step guide, you’ve equipped yourself with the tools to craft an engaging gig that attracts attention, communicates value, and ultimately converts browsers into satisfied clients.
FAQs & Answers
1. Can I update my gig details after they’ve been published?
You can edit and update your gig information at any time. Simply navigate to your Fiverr dashboard, select the gig you want to change, and click the “Edit” button.
2. What exactly are gig extras, and should I provide them?
Gig extras are services or features that purchasers can add to their order for a charge. Offering gig extras can increase your earnings while also giving buyers more personalization possibilities.
3. How can I price my gig competitively?
When determining your prices, consider your talents, expertise, and market demand. Investigate what other suppliers of comparable services charge to verify your pricing is competitive and reflects your value.


