How to tie a bowline knot – The bowline knot is one of the most fundamental knots every outdoor enthusiast, sailor, or avid camper should know. Known for its versatility and strength, the bowline knot creates a secure loop that can be easily untied, making it an essential skill to have in your knot-tying repertoire. Whether you’re securing a tent, attaching a rope to a post, or rescuing someone in need, mastering the art of tying a bowline knot is a valuable skill. EnoughInfo.com
The bowline knot is one of the most useful knots to learn. The Bowline creates a secure loop that is easy to tie and untie. The Bowline is most usually used at the end of a line to produce a permanent loop, large or tiny. This knot has been tried and tested over the years and is dependable, strong, and sturdy. How to play the piano by ear(step-by-step guide)
Even after applying significant force, it is simple to untie. However, because it is so readily untied, it should not be trusted in a life-or-death situation like mountain climbing. It is supposed to keep 60% of the strength of the line it is linked to.
Read Also: How To Make Money Without A Job (30 Authentic Ways)
In this article, we’ll guide you through the steps to tie a bowline knot effectively.
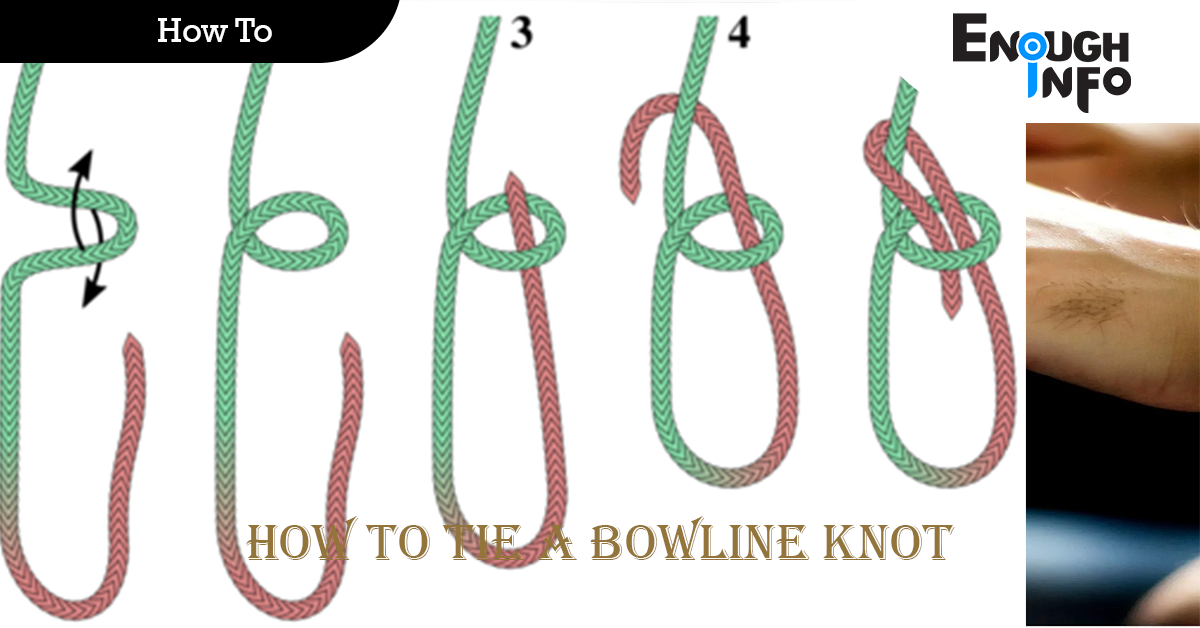
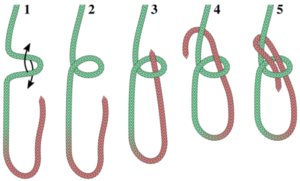
The steps for tying a bowline knot are as follows:
Step 1: Form the Loop To start tying a bowline knot, hold the rope in your right hand, with the free end hanging down. Create a small loop in the rope by bringing the free end up and over the standing part of the rope, forming a “U” shape. How to make a homemade face mask
Step 2: Thread the Rabbit Hole Next, take the free end, and pass it through the loop you just created from underneath, entering from the top. Imagine the free end as a rabbit running up the hole (the loop) and then diving back down into the hole.
Step 3: Around the Tree and Back Down After threading the rabbit hole, bring the free end of the rope behind the standing part. Form a counterclockwise turn by bringing the free end around the standing part of the rope, passing it from behind to the front.
Step 4: Tuck the Rabbit into Its Hole Now, guide the free end of the rope back through the rabbit hole (the small loop) you created initially. Make sure the free end passes over the standing part of the rope as it re-enters the loop. This completes the bowline knot.
Step 5: Tighten and Inspect Gently pull the standing part of the rope while holding the free end to tighten the bowline knot. Ensure that the knot is snug but not overly tight. Take a moment to inspect the knot for any twists or misalignments. A properly tied bowline knot should resemble a secure loop with the free end exiting the knot parallel to the standing part.
Congratulations! You have successfully tied a bowline knot. With practice, you’ll be able to tie this versatile knot quickly and efficiently, even in challenging situations.
Read Also: How To Make Money Without A Job (30 Authentic Ways)
Benefits and Uses of the Bowline Knot:
- Rescue Operations: The bowline knot is often used in rescue situations where a secure loop is needed, such as creating a harness or securing a rope around a person or object.
- Camping and Hiking: This knot is handy for various camping and hiking tasks. You can use it to secure a tarp or tent, hang a hammock, or create a makeshift clothesline.
- Boating and Sailing: The bowline knot is invaluable in boating and sailing activities. It’s used to fasten sheets and halyards, secure lines to cleats, or even rescue someone who has fallen overboard. How To Control A Narcissist (Actions to Take)
- Rock Climbing: The bowline knot is an essential knot for rock climbers, particularly when tying into a climbing harness. It provides a secure loop with a reliable safety mechanism.
Remember, practice makes perfect when it comes to tying knots. Spend some time honing your skills by repeatedly tying and untying the bowline knot. It’s crucial to be comfortable and confident in your knot-tying abilities, as this knot can be a lifesaver in various situations.
The bowline knot is a versatile and reliable knot that every outdoor enthusiast, adventurer, or sailor should know. By following the step-by-step instructions outlined in this article and practicing regularly, you’ll soon be able to tie a bowline knot with ease and confidence. Whether you’re embarking on a camping trip, setting sail on a boat, or engaging in adventurous activities like rock climbing, having the skill to tie a bowline knot can enhance your safety and efficiency.
Instructions for Tying a Bowline Knot
- With the free end of the rope hanging down, cross it across your left hand. In your palm, make a little loop in the line.
- Bring the free end up to the eye and pass it through from the underside (the rabbit will emerge out of the hole).
- Wrap the line around the standing line and back down the hole (around the tree and down the hole). How To Paint A Sunset With Acrylics(The Ultimate Guide)
- Tighten the knot by pulling on the free end of the line while holding the standing line.
Additional tips to keep in mind:
- Maintain Tension: Throughout the process of tying the bowline knot, it’s essential to maintain tension on the rope. This ensures that the knot remains secure and doesn’t loosen over time. Keep a firm grip on both the standing part and the free end of the rope as you go through each step.
- Practice with Different Rope Sizes: Bowline knots can be tied with ropes of various thicknesses. It’s beneficial to practice tying the knot with different rope sizes to familiarize yourself with how the knot behaves and adapts to different materials. This way, you’ll be prepared to tie a bowline knot regardless of the rope thickness you encounter.
- Familiarize Yourself with the “Bite” Concept: In knot-tying terminology, the “bite” refers to the part of the rope that forms the loop in the knot. Understanding this concept can help you visualize and remember the steps involved in tying a bowline knot. The “rabbit” enters the “hole” (the loop), goes around the “tree” (the standing part), and then returns to the “hole.” How to fix a leaky faucet(The Ultimate Guide)
- Practice Unfastening the Knot: While the bowline knot is known for its strength and security, it’s equally important to be able to untie it easily when needed. Familiarize yourself with the steps to untie the bowline knot efficiently. By practicing untying the knot, you’ll gain confidence in your ability to release it quickly and without causing any unnecessary damage to the rope. https://enoughinfo.com/how-to-tie-a-bowline-knot
Read Also: 22 Top Foods For Promoting Heart Health(All You Need to Know)
Remember, mastering the bowline knot takes time and patience. Practice in a controlled environment before relying on this knot in real-life situations where your safety may depend on it. With practice, you’ll develop muscle memory and tie the bowline knot effortlessly.
And also, it’s always beneficial to expand your knowledge of other knots as well. Different situations may call for different types of knots, each with its own unique advantages and applications. Adding a variety of knots to your skill set will make you a more versatile and resourceful outdoors person.
FAQs & Answers
1, What is the bowline knot used for?
2, Why is the bowline knot popular?
The bowline knot is popular due to its strength, reliability, and ease of untying. It creates a secure loop that holds well under tension but can be easily untied, even after being loaded heavily.
3, Is the bowline knot safe?
Yes, when properly tied, the bowline knot is considered a safe and secure knot. It is important to learn and practice the correct technique to ensure the knot is tied correctly and remains secure during use.
4, Can the bowline knot slip or come undone?
When tied correctly, the bowline knot is known for its stability and resistance to slipping. However, like any knot, it is essential to inspect it carefully before relying on it and ensure that it is properly tightened and secured. https://enoughinfo.com/how-to-tie-a-bowline-knot
5, Are there any variations of the bowline knot?
Yes, there are variations of the bowline knot, such as the double bowline or the Yosemite bowline, which offer additional security or ease of untying in specific situations. It is worth exploring these variations as you gain more experience with knot tying.
6, can I practice tying the bowline knot?
You can practice tying the bowline knot using a rope or cord of suitable thickness. Start by tying and untying the knot repeatedly until you become comfortable with the steps involved. Gradually increase your speed while maintaining accuracy to build muscle memory.
7, Are there other knots I should learn along with the bowline knot?
Yes, there are several other knots worth learning, depending on your specific needs. Some useful knots to explore include the square knot, clove hitch, figure-eight knot, and sheet bend. Each knot has its own applications and advantages, so expanding your knowledge of knots will make you a more well-rounded knot-tying practitioner.
Remember, practice and repetition are key to mastering the bowline knot or any other knot. With time and experience, you will become proficient and confident in your knot-tying skills.
Conclusion
Learning how to tie a bowline knot is an essential skill for anyone venturing into outdoor activities or working with ropes. Its simplicity, versatility, and reliability make it a go-to knot for various purposes. By following the step-by-step instructions, practicing regularly, and familiarizing yourself with the knot’s intricacies, you’ll become proficient in tying the bowline knot and be well-prepared to tackle any adventure that comes your way.