How to make homemade ice cream without an ice cream maker – Nothing beats the creamy indulgence of homemade ice cream, especially during the hot summer months. While you may think that making ice cream at home requires fancy equipment like an ice cream maker, it’s actually possible to achieve a luscious, homemade treat without one. EnoughInfo.com
Making homemade ice cream is nearly as simple as making custard.
Read Also; 30 Hobbies That Make You Money
Steps in Making Delicious Homemade Ice Cream without an Ice Cream Maker
In this article, we’ll guide you through the process of making homemade ice cream without an ice cream maker, using simple ingredients and techniques that will leave your taste buds satisfied.
1. Chill Ingredients and Equipment:
To ensure smooth and creamy ice cream, start by chilling your ingredients and equipment. Place your mixing bowl and beaters in the freezer for about 15-20 minutes. Additionally, make sure your cream, milk, and other ingredients are chilled before beginning the process.
2. Choose a Base Recipe:
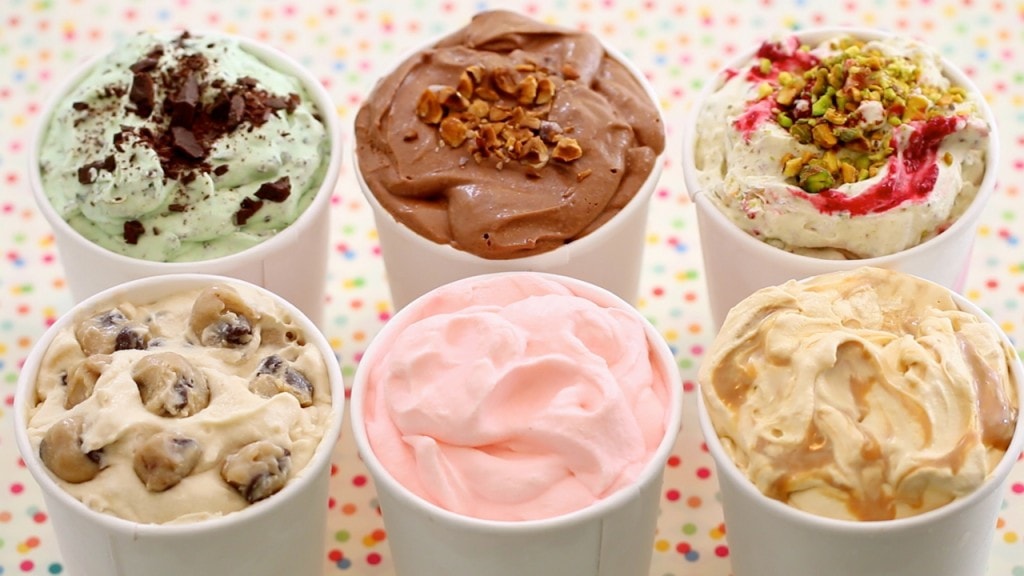
Select a base recipe for your ice cream. A classic custard-based recipe typically includes cream, milk, sugar, and egg yolks. However, you can also explore alternative options such as using condensed milk, yogurt, or coconut milk for a dairy-free variation. Choose a flavor that excites you, whether it’s vanilla, chocolate, strawberry, or any other creative combination.
3. Prepare the Base:
In a mixing bowl, combine your chilled cream, milk, sugar, and any flavorings or extracts as specified in your chosen recipe. Whisk the ingredients until the sugar has dissolved completely. For a custard base, heat the mixture on the stovetop over low heat, stirring constantly until it thickens and coats the back of a spoon. Remove from heat and let it cool to room temperature.
4. Add Mix-Ins and Flavors:
Once your base has cooled, it’s time to add your desired mix-ins and flavors. Whether it’s fresh fruits, chocolate chips, crushed cookies, or nuts, gently fold them into the base mixture. Get creative and experiment with different combinations to tailor the ice cream to your taste preferences. How To Start A YouTube Channel (Step By Step)
5. Freezing Method 1:
Whisking: Pour the mixture into the chilled mixing bowl. Using an electric hand mixer or a whisk, beat the mixture vigorously for a few minutes to incorporate air and prevent the formation of ice crystals. Continue whisking every 30 minutes for the first few hours of freezing. This method helps create a smoother texture.
6. Freezing Method 2:
Freeze and Stir: Alternatively, if you prefer a more hands-off approach, pour the mixture into a shallow, freezer-safe container. Place it in the freezer and let it freeze for about 1-2 hours or until the edges begin to set. Remove from the freezer and vigorously stir the semi-frozen mixture with a fork or spatula, breaking up any ice crystals. Repeat this process every 30 minutes for the first few hours. How To Do Basic Car Repairs(Ultimate Guide)
7. Repeat and Blend:
Regardless of the freezing method you choose, repeat the whisking or stirring process every 30 minutes for the first 2-3 hours to break up ice crystals and ensure a smoother consistency. This step is crucial for achieving creamy homemade ice cream without an ice cream maker.
8. Final Freeze and Serve:
After the initial freezing and stirring process, let the ice cream mixture freeze undisturbed for an additional 4-6 hours or until it reaches the desired firmness. Cover the container with a lid or plastic wrap to prevent ice crystals from forming. Once fully frozen, your homemade ice cream is ready to be enjoyed! How to tie a scarf in different ways
9. Serving Suggestions:
Serve your homemade ice cream in bowls, cones, or alongside your favorite desserts. Get creative with toppings like sprinkles, chocolate sauce, whipped cream, or fresh fruit. The possibilities are endless, and you can personalize your creations to suit your preferences.
10. Storage:
If you have any leftover ice cream, store it in an airtight container in the freezer. To maintain its creamy texture, place a piece of plastic wrap directly on the surface of the ice cream before sealing the container. Homemade ice cream is best consumed within a few weeks to ensure optimal taste and texture. https://enoughinfo.com/how-to-make-home…-ice-cream-maker
11. Tips for Success:
- Ensure all ingredients and equipment are chilled before starting the process.
- Use high-fat content cream for a creamier texture.
- Avoid overmixing the ice cream mixture to prevent excessive air incorporation.
- Experiment with flavors and mix-ins to create unique combinations.
- Allow the ice cream to soften slightly at room temperature for a few minutes before serving for easier scooping. How To Train For A 5K Race(The Ultimate Guide)
12. Safety Precautions:
- When using eggs in your ice cream base, make sure to cook them properly to eliminate any risk of foodborne illnesses. https://enoughinfo.com/how-to-make-home…-ice-cream-maker
- Be cautious when handling freezing cold bowls or containers to avoid any injuries.
Read Also: 22 Top Foods For Promoting Heart Health(All You Need to Know)
Some Homemade Ice Cream Method Without an Ice Cream Maker
Method #1: Ice Cream with Only Two Ingredients
This procedure is a recipe in and of itself!
Here are the simple steps:
Simply beat 2 cups of heavy cream until stiff peaks form, either by hand or with an electric mixer.
Drizzle in a chilled can of sweetened condensed milk slowly.
Add whatever flavorings or mix-ins you choose.
Place in an airtight container and place in the freezer.
Method #2: Use a Plastic Bag
Fill a quart-size resealable bag halfway with the ice cream mixture, pushing out as much air as possible and closing tightly.
Insert this bag into a second-quart bag, squeezing out as much air as possible and closing tightly.
Fill a gallon-size resealable bag with roughly 4 cups crushed ice, then sprinkle with 4 teaspoons coarse salt. The salt lowers the freezing point of the ice, resulting in an extra-cold environment that absorbs heat and causes the ice cream base to freeze.
Squeeze out all of the air and tighten the seal.
Wrap the bag in a towel or put on gloves before rapidly shaking and rubbing the bag, ensuring that the ice cream mixture is continually surrounded by ice.
Shake for 5–8 minutes, or until the ice cream is completely frozen. The faster you shake, the smoother your ice cream will be.
Method #3: Using a Food Processor or Blender
This is a new way that has been added since the publication of this article and video in 2015. This is my preferred method for making ice cream without an ice cream maker.
Make any ice cream base according to the directions on the package.
Instead of churning in an ice cream maker, pour the mixture into a zip-top bag, squeeze out all of the air, and seal. 5 Best Ways To Reheat Steak( A Complete Guide )
Freeze until solid, resting flat.
Remove from frozen and cut into small chunks large enough to fit into the bowl of a food processor or high-powered blender.
Pulse until the mixture is absolutely smooth.
If using mix-ins, fold them in or pulse until desired consistency is achieved before pouring them into an airtight container.
Cover and place in the freezer until ready to serve.
Read Also: How To Make Homemade Candles (Step By Step)
FAQs & Answers
Can I use low-fat milk or alternative milk options to make homemade ice cream?
How long does it take to freeze homemade ice cream without an ice cream maker?
The freezing time for homemade ice cream without an ice cream maker can vary depending on factors such as the size of the container and the temperature of your freezer. Typically, it takes about 4-6 hours for the ice cream to freeze to a firm consistency. However, the initial stirring or whisking process during the first few hours is crucial for achieving a smoother texture.
Can I use sweeteners other than sugar in homemade ice cream?
Yes, you can use alternative sweeteners like honey, maple syrup, or agave nectar to sweeten your homemade ice cream. Keep in mind that different sweeteners may affect the texture and freezing properties of the ice cream. It may require some experimentation to find the right balance and consistency when using alternative sweeteners.
How can I prevent ice crystals from forming in homemade ice cream?
To prevent ice crystals from forming in your homemade ice cream, it’s important to incorporate air into the mixture during the freezing process. This can be achieved by whisking vigorously or stirring the partially frozen mixture every 30 minutes for the first few hours. Breaking up ice crystals and ensuring proper distribution of the mixture will result in a smoother texture.
Can I make vegan or dairy-free ice cream without an ice cream maker?
Absolutely! There are various methods to make vegan or dairy-free ice cream without an ice cream maker. Instead of dairy milk and cream, you can use alternative milk options like coconut milk, almond milk, or soy milk. Explore recipes that incorporate these ingredients along with natural sweeteners and flavorings for delicious vegan ice cream options.
Can I add mix-ins like cookies or fruits to homemade ice cream?
Yes, you can add mix-ins like crushed cookies, chocolate chips, nuts, or fruits to your homemade ice cream. Fold them into the base mixture after it has cooled and before freezing. Adding mix-ins enhances the flavor and texture of the ice cream, providing delightful surprises with each spoonful.
Can I make larger batches of homemade ice cream without an ice cream maker?
Yes, you can make larger batches of homemade ice cream without an ice cream maker. However, keep in mind that the freezing and stirring process may take longer, and you might need to divide the mixture into multiple containers to ensure proper freezing. It’s important to have enough freezer space to accommodate the containers and maintain the desired texture of the ice cream.
Read Also: How To Make A Homemade Pizza From Scratch
Conclusion:
Creating delicious homemade ice cream without an ice cream maker is easier than you might think. By following these simple steps, you can enjoy a velvety and flavorful frozen treat right in the comfort of your own kitchen. Whether you prefer classic flavors or innovative combinations, the joy of homemade ice cream is unmatched. So, gather your ingredients, chill your equipment, and embark on a delightful ice cream-making adventure. Get ready to savor every creamy spoonful of your homemade creation!