How to make homemade soap – Soap making is a rewarding and creative craft that allows you to create your own personalized soaps using natural ingredients. Making homemade soap gives you control over the ingredients, scents, and textures, allowing you to customize the soap to suit your needs and preferences. If you’re interested in diving into the world of soap making, this comprehensive guide will take you through the process step by step. Get ready to embark on a journey of creativity, self-sufficiency, and beautifully crafted soaps.enoughinfo
Read Also: How To Make A Homemade Natural Cleaning Solution
How to Make Homemade Soap: A Comprehensive Guide
Soap has been made for centuries using a simple process that involves combining fats or oils with an alkali, such as lye. This chemical reaction, called saponification, transforms the ingredients into soap. While traditional soap making was done using animal fats, modern soap makers have a wide range of oils and butter to choose from, allowing for endless possibilities in soap formulation. Homemade soap can be crafted with nourishing oils, natural colors, and delightful fragrances, making it a luxurious and beneficial addition to your skincare routine.
Safety Precautions:
Soap making involves working with lye, which is a caustic substance that can cause burns if mishandled. It’s crucial to follow proper safety precautions when working with lye and throughout the soap making process.
Here are some essential safety guidelines to keep in mind:
- Always wear protective gear, including gloves, safety glasses, and long-sleeved clothing.
- Work in a well-ventilated area or use a mask to avoid inhaling fumes.
- Keep children and pets away from your workspace.
- Handle lye with extreme caution, ensuring it doesn’t come into contact with your skin or eyes.
- Mix lye with water, not the other way around, to prevent splashing and potential eruptions.
- Keep vinegar or a neutralizing agent nearby to neutralize any spills or splashes of lye.
- Label all your soapmaking tools and containers to avoid confusion.
- Clean up your workspace thoroughly after soapmaking.
By adhering to these safety precautions, you can enjoy the soap making process while ensuring your well-being.
Ingredients and Equipment:
To make homemade soap, you’ll need a variety of ingredients and equipment. Here’s a list of essential items you’ll require:
Ingredients:
- Oils and/or fats: Choose from a wide range of oils, such as olive oil, coconut oil, palm oil, almond oil, and shea butter. Each oil contributes unique properties to the soap.
- Lye (sodium hydroxide): Lye is a crucial ingredient in soap making as it reacts with the oils or fats to create soap through saponification. Ensure you purchase 100% pure sodium hydroxide specifically labeled for soap making.
- Distilled water: Distilled water is used to mix with lye. It’s important to use distilled water to avoid impurities or minerals that may interfere with the soapmaking process.
- Fragrance or essential oils: Fragrance oils or essential oils are added to give the soap a pleasant scent. Ensure the fragrance oils are specifically formulated for soapmaking, and if using essential oils, research their usage rates and potential skin sensitivities.
- Colorants: Natural colorants, such as herbs, clays, or botanical powders, can be used to add color to your soap. You can also opt for cosmetic-grade micas or soap dyes for vibrant colors.
- Additives: Additional ingredients like exfoliants, such as oatmeal or poppy seeds, or moisturizing ingredients like aloe vera gel or honey, can be added to enhance the properties of your soap.
Read Also: How To Remove Stains From Upholstery
Equipment:
Heat-resistant containers: Use separate containers for measuring lye and oils. Stainless steel, tempered glass, or heat-resistant plastic containers are suitable.
Stick blender: A stick blender or immersion blender is used to blend the oils and lye solution together quickly and efficiently.
Thermometer: A digital or candy thermometer is necessary to monitor the temperatures of the lye solution and oils accurately.
Soap molds: Choose molds that are heat-resistant and suitable for soapmaking. Silicone molds are popular due to their flexibility and ease of soap removal.
Spatulas and spoons: Use heat-resistant spatulas and spoons for mixing and stirring the ingredients.
Protective gear: As mentioned earlier, wear gloves, safety glasses, and long-sleeved clothing to protect yourself from potential accidents.
Scale: A digital scale is essential for precise measurements of ingredients.
Towels or blankets: These are used to insulate the soap while it cures.
Cold Process Soap Making Method:
The cold process method of soap making involves combining oils or fats with a lye solution at a controlled temperature. The soap mixture is then poured into molds and left to cure for several weeks.
Here’s a step-by-step guide on how to make soap using the cold process method:
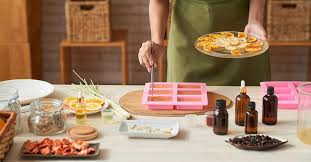
Step 1: Prepare Your Work Area Choose a clean and well-ventilated workspace. Protect the surface with newspaper or a plastic sheet. Gather all the necessary ingredients and equipment.
Step 2: Measure Ingredients Measure the oils and fats using a digital scale according to your chosen recipe. Place them in separate heat-resistant containers.
Step 3: Prepare Lye Solution Put on your protective gear, including gloves and safety glasses. In a well-ventilated area, carefully measure the required amount of distilled water into a heat-resistant container. Slowly add the lye to the water while stirring gently. Avoid inhaling the fumes. Stir until the lye is completely dissolved. Set the lye solution aside to cool.
Step 4: Heat Oils Heat the oils and fats on low heat until they are fully melted. Monitor the temperature using a thermometer and maintain it at around 100-110°F (38-43°C). Remove the oils from heat and let them cool slightly.
Step 5: Mix Lye Solution and Oils Once the lye solution and oils have reached a similar temperature (around 100-110°F or 38-43°C), pour the lye solution into the melted oils. Use a stick blender to blend the mixture. Insert the blender into the mixture, making sure it is fully submerged, and blend in short bursts. Continue blending until the mixture reaches a “trace” stage. Trace refers to a consistency similar to thin pudding or custard, where the mixture leaves a faint trail when drizzled over the surface.
Step 6: Add Fragrance, Color, and Additives Once the soap mixture has reached trace, add your chosen fragrance or essential oils. Stir them into the mixture using a spoon or spatula. If you’re using colorants or additives, add them at this stage and mix well to distribute them evenly.
Step 7: Pour Soap into Mold Carefully pour the soap mixture into your prepared soap molds. Tap the molds gently on the countertop to eliminate any air bubbles. Smooth the surface of the soap using a spatula or the back of a spoon.
Step 8: Insulate and Cure Cover the soap molds with a towel or blanket to insulate them and retain heat. This encourages a slow and even gel phase, which enhances the quality of the soap. Leave the soap undisturbed in a cool and dry area for 24 to 48 hours.
After the initial insulation period, remove the towels or blankets and allow the soap to cure further. Depending on the recipe and ingredients, the soap will need to cure for about 4 to 6 weeks. During this time, the soap will harden and excess moisture will evaporate, resulting in a milder and longer-lasting bar.
Read Also: How To Make Homemade Natural Cleaning Products
FAQs & Answers:
a. Can I use tap water instead of distilled water?
Distilled water is recommended because it doesn’t contain impurities or minerals that may affect the soap’s quality. However, if your tap water is relatively soft and free from contaminants, you can use it. Just be aware that hard water may impact the soap’s performance and appearance.
b. What oils are best for soap making?
There are various oils suitable for soap making, each offering different properties. Common oils include olive oil, coconut oil, palm oil, almond oil, and shea butter. Research their properties and consider creating your own unique blend based on your preferences and desired characteristics for the soap.
c. Can I use essential oils for fragrance?
Yes, you can use essential oils to add fragrance to your soap. However, it’s important to research and follow the recommended usage rates for each essential oil. Some essential oils may cause skin sensitivities or fade over time, so choose high-quality oils and consider stability when selecting scents.How to make homemade soap
d. How long does it take for the soap to cure?
Soap generally needs to cure for about 4 to 6 weeks. During this time, excess moisture evaporates, resulting in a harder and milder bar of soap. However, some soaps may require longer curing periods, so check the specific recipe or consult experienced soap makers for guidance.
e. Can I use food coloring for coloring soap?
It’s generally not recommended to use food coloring for soap making. Food coloring is not stable in the alkaline environment of soap and may fade or produce unexpected results. It’s best to use cosmetic-grade micas, natural colorants, or soap dyes specifically formulated for soap making.
f. How do I prevent soda ash on my soap?
Soda ash refers to a white, powdery substance that can form on the surface of soap. To minimize soda ash, you can spritz the soap with 91% isopropyl alcohol immediately after pouring it into the molds. Additionally, covering the soap with plastic wrap during the initial insulation period can help prevent ash formation. If soda ash still forms, it can be easily removed by gently washing or wiping the soap with warm water.
g. Can I use my homemade soap right away?
While you can technically use your homemade soap after the initial cure time of 24 to 48 hours, it’s generally recommended to allow it to cure for a few weeks to achieve a milder and longer-lasting bar. Curing allows excess moisture to evaporate, resulting in a harder and more stable soap.
Read Also: How to clean silver jewelry at home
h. What are some common mistakes to avoid in soap making?
- Inaccurate measurements: Ensure you measure your ingredients accurately to maintain the correct balance between oils, lye, and water.
- Not wearing protective gear: Always prioritize safety by wearing gloves, safety glasses, and long sleeves to protect yourself from lye and other potentially harmful substances.
- Not following proper lye handling procedures: Handle lye with caution, ensuring it doesn’t come into contact with your skin or eyes. Always add lye to water, not the other way around, and work in a well-ventilated area.
- Not properly insulating or curing soap: Insulation and curing are crucial steps in soapmaking. Properly insulating the soap during the initial phase and allowing it to cure for the recommended time will result in a better quality soap.
- Adding fragrance or additives at the wrong stage: Ensure you add fragrances, colorants, and additives when the soap mixture has reached trace to ensure even distribution.
- Overcomplicating your first batch: It’s best to start with a simple recipe and gain experience before experimenting with complex ingredients or techniques.
Read Also: How To Be A Clean Person (10 Great Ways)
Conclusion
Making homemade soap is a rewarding and creative endeavor that allows you to craft unique, personalized soaps tailored to your preferences. By following proper safety precautions, gathering the necessary ingredients and equipment, and understanding the cold process soapmaking method, you can embark on a soapmaking journey filled with creativity and self-sufficiency. Remember to explore different oils, scents, colors, and additives to create soaps that not only cleanse but also nourish and delight your senses. With patience and practice, you’ll be able to produce beautiful, handmade soaps that bring joy to yourself and those around you. Happy soapmaking!