How to make homemade jam – There’s something truly special about homemade jam that can’t be replicated by store-bought alternatives. The rich flavors, vibrant colors, and the satisfaction of creating something from scratch make the homemade jam a delightful addition to any pantry. Whether you have an abundance of fresh fruits or simply want to embark on a culinary adventure, making homemade jam is a rewarding and enjoyable process.
Learning how to make homemade jam is important because it allows you to control the quality of ingredients, preserve seasonal fruits, avoid artificial additives, explore your creativity, save money, bond with others, reduce food waste, and create meaningful gifts. It’s a fulfilling and enjoyable culinary skill that brings both personal satisfaction and shared joy.enoughinfo
Read Also: How To Make Homemade Bread(Step By Step)
In this article, we’ll provide you with a step-by-step guide on how to make your very own homemade jam that will be the envy of all your friends and family.
Before we dive into the process, it’s important to understand the basic principles of jam-making and the essential ingredients and equipment you’ll need.
Understanding Jam-Making:
Jam-making is the process of preserving fruits by cooking them with sugar, which acts as a natural preservative. The sugar helps to draw out the fruit’s natural pectin, a gelling agent that thickens the mixture and gives jam its characteristic texture. Additionally, acid from the fruit helps to set the jam by reacting with the pectin.
Ingredients:
- Fresh Fruits: Choose ripe, high-quality fruits at their peak of flavor. Common options include strawberries, raspberries, blueberries, peaches, apricots, and plums. You can also experiment with combinations of different fruits for unique flavors.
- Sugar: Granulated white sugar is the most commonly used sweetener in jam-making. It not only sweetens the jam but also helps with preservation and texture. The ratio of fruit to sugar will vary depending on the fruit’s natural sweetness and acidity, but a general guideline is to use equal parts fruit and sugar by weight.
- Acid: Many fruits naturally contain enough acid for jam-making. However, if you’re using low-acid fruits like peaches or plums, you may need to add lemon juice or citric acid to ensure proper gelling.
- Pectin (optional): Some fruits have low natural pectin levels, which can result in a runny jam. In such cases, you can use commercial pectin to ensure a firmer set. However, for this guide, we’ll focus on making jam without added pectin.
Equipment:
- Large pot or saucepan: Choose a pot that is large enough to hold the fruit and sugar mixture comfortably.
- Wooden spoon or silicone spatula: These tools are ideal for stirring the jam during the cooking process.
- Jam jars: Sterilized glass jars with airtight lids are necessary for proper storage. Ensure they are clean and in good condition.
- Canning equipment: If you plan to store the jam for an extended period, you’ll need canning equipment, including a water bath canner, jar lifter, and canning funnel.
Read Also: How to make homemade ice cream without an ice cream maker
A Comprehensive Guide On How To Make Homemade Jam
Now that we have a good understanding of the basic ingredients and equipment, let’s dive into the step-by-step process of making homemade jam.
Step 1: Prepare the Fruit
Start by washing the fruits thoroughly, removing any stems, leaves, or damaged parts. For larger fruits, like peaches or plums, peel them and remove the pits. Then, chop or mash the fruits according to your desired texture. Some jams benefit from small chunks of fruit, while others may require a smoother consistency.
Step 2: Combine the Fruit and Sugar
In a large pot or saucepan, combine the prepared fruit and sugar. Mix well to ensure the sugar is evenly distributed. Let the mixture sit for 15-30 minutes, allowing the sugar to draw out the fruit’s juices.
Step 3: Heat the Mixture
Place the pot over medium-high heat and bring the mixture to a boil. Stir frequently to prevent the jam from sticking
Step 4: Skim off Foam
As the mixture begins to boil, foam may form on the surface. Use a spoon or ladle to skim off the foam and discard it. This step helps to achieve a clear and smooth jam.
Step 5: Test for Doneness
To determine if the jam has reached the desired consistency, you can perform a “wrinkle test.” Place a small plate in the freezer beforehand. After the jam has been boiling for a few minutes, take a spoonful and carefully pour it onto the chilled plate. Allow it to cool for a moment, then push it gently with your fingertip. If the surface wrinkles and holds its shape, the jam is ready. If not, continue cooking and retest after a few minutes.
Read Also: How To Make A Homemade Face Scrub
Step 6: Add Acid (if needed)
If your fruit has low acidity, it’s crucial to add acid to ensure proper gelling. Lemon juice is a commonly used acid and can be added during the cooking process. Start by adding a tablespoon of lemon juice and adjust according to taste and the desired tartness.
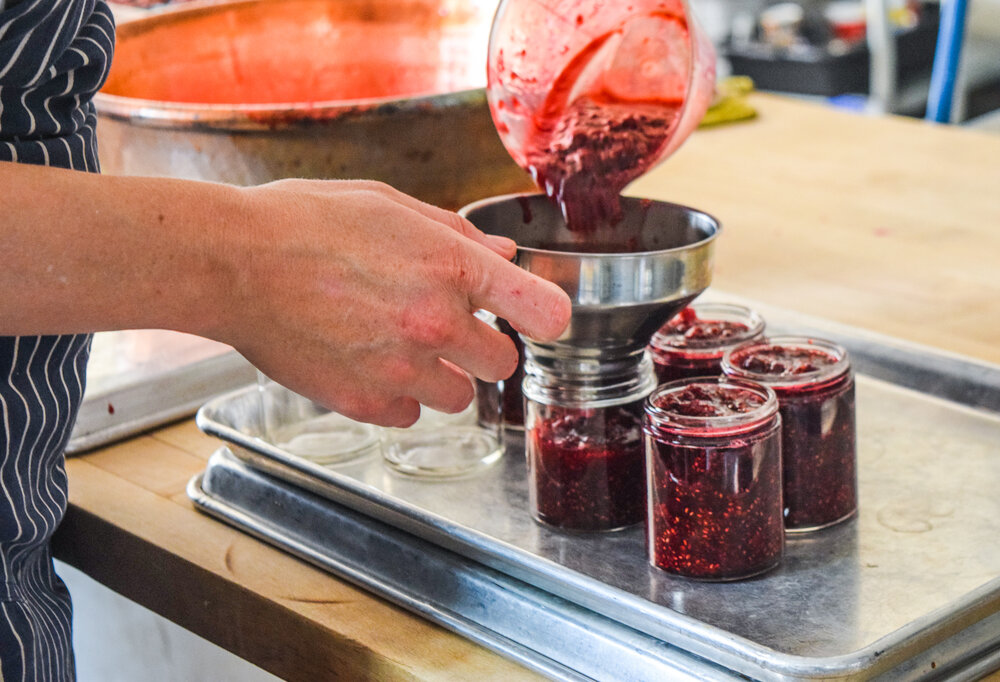
Step 7: Fill the Jars
Once the jam has reached the desired consistency, remove the pot from the heat. Using a canning funnel, carefully ladle the hot jam into sterilized jars, leaving about ¼ inch of headspace at the top. Wipe the rims of the jars with a clean, damp cloth to remove any residue or spills.
Step 8: Seal and Process the Jars (optional)
If you plan to store the jam for an extended period, you can use a water bath canner to seal the jars. Place the filled jars into the canner, ensuring they are covered with at least one inch of water. Process according to the recommended time for your altitude and the type of fruit being used. Once processed, carefully remove the jars from the canner and let them cool on a towel-lined surface.
Step 9: Store and Enjoy
After the jam jars have cooled, check to ensure they are properly sealed. Press down on the lids; if they don’t move or make a popping sound, they are sealed correctly. Label the jars with the date and the type of jam, then store them in a cool, dark place. Homemade jam can typically be stored for up to a year, but it’s best to consume it within 6-8 months for optimal flavor.
Read Also: How To Bake Chocolate Chip Cookies
Tips And Variations
- Experiment with flavors: Feel free to mix different fruits or add spices like cinnamon or ginger to create unique flavor combinations.
- Adjust sweetness: If you prefer a less sweet jam, you can reduce the amount of sugar while ensuring it still reaches a proper gel.
- Consider low-sugar and sugar-free options: There are recipes available that use low-sugar alternatives like honey or stevia for those looking for healthier options.
- Get creative with presentations: Homemade jam makes a wonderful gift. Consider adding decorative labels, ribbons, or personalized tags to make them extra special.
- Troubleshooting: If your jam doesn’t set properly, you can reboil it with added lemon juice or use it as a delicious sauce over ice cream or pancakes.
What Is The Shelf Life Of Homemade Jam?
Properly sealed and stored homemade jam can have a shelf life of up to one year. However, it’s recommended to consume it within 6 to 8 months for the best quality and flavor.
Can I Reduce The Amount Of Sugar In Jam Recipes?
Yes, you can reduce the amount of sugar in jam recipes. However, sugar plays a crucial role in the preservation and texture of the jam, so it’s important to follow a reliable recipe or use a low-sugar or no-sugar pectin substitute.
How Can I Fix A Jam That Didn’t Set Properly?
If your jam didn’t set properly, you can recook it by adding more pectin or lemon juice to enhance the gelling process. Follow the instructions provided in the troubleshooting section for more detailed guidance.How to make homemade jam
Can I Use Frozen Fruits To Make Jam?
Yes, you can use frozen fruits to make jam. Thaw the fruits before cooking, and adjust the cooking time as needed since frozen fruits tend to release more liquid.
Is Pectin Necessary For Making Jam?
Pectin is not always necessary for making jam. Some fruits naturally contain enough pectin to achieve a good set. However, for fruits low in pectin, using commercially available pectin or natural pectin sources like citrus peels or apples can help achieve the desired consistency.
Read Also: How to plant tomatoes in pots(The Ultimate Guide)
Conclusion
Making homemade jam is a delightful and rewarding experience. By following these steps and experimenting with different fruits and flavors, you can create a pantry full of delicious and personalized jams. Whether you enjoy it spread on toast, paired with scones, or incorporated into your favorite recipes, homemade jam is a delightful addition to any kitchen. So roll up your sleeves, gather your ingredients, and embark on a journey of culinary creativity and sweet rewards with homemade jam.