How To Paint A Landscape With Oil Paints

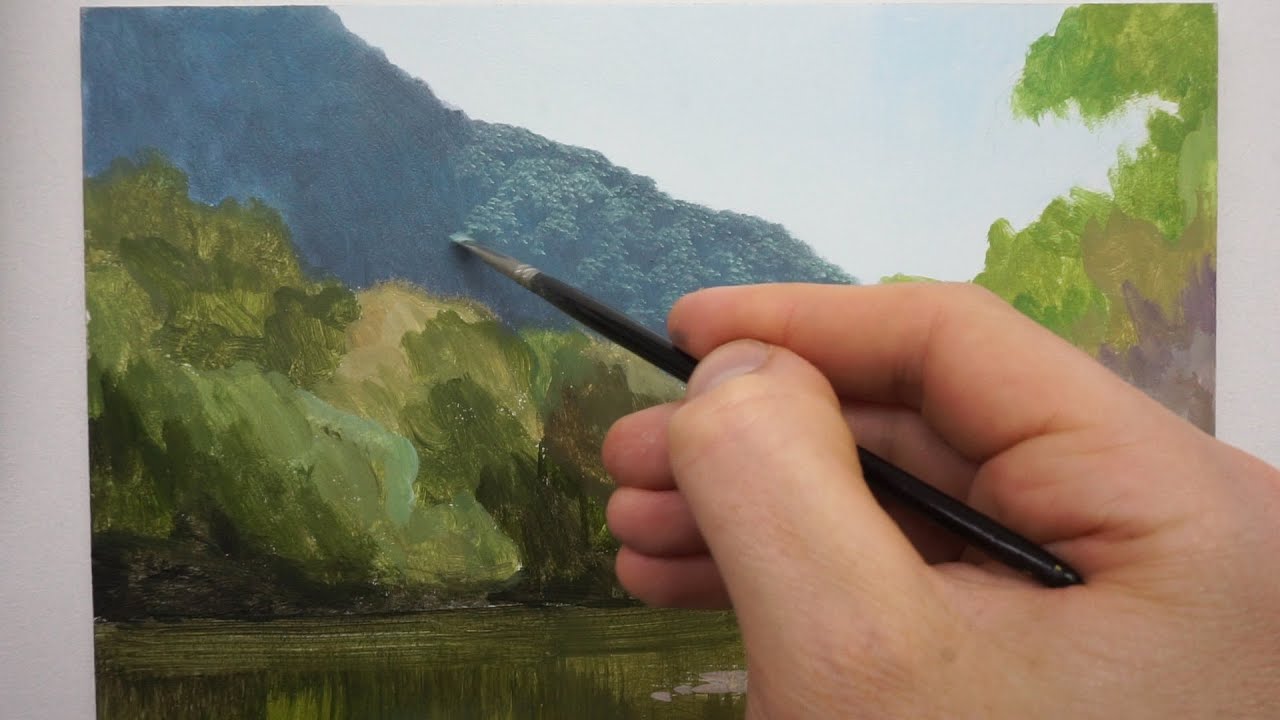
How to paint a landscape with oil paints – Landscape painting has a rich history, with artists throughout the ages capturing the beauty of nature in various styles and techniques. Oil painting, with its versatility and ability to blend and layer colors, allows artists to create realistic and expressive landscapes. Whether you are inspired by serene mountains, picturesque meadows, or breathtaking seascapes, oil paints can help you bring your vision to life.enoughinfo
Read Also: How To Make A DIY Gift For A Friend
In this article, we will explore the step-by-step process of painting a landscape with oil paints, from selecting the right materials to creating depth and atmosphere in your artwork. Whether you are a beginner or an experienced artist, this guide will help you master the art of landscape painting with oils.
Gathering the Right Materials:
Before diving into the painting process, it’s important to gather the necessary materials. Here are the key components you’ll need:
1. Oil Paints and Colors:
Invest in artist-grade oil paints for vibrant colors and better consistency. Select a range of colors that includes primary colors (red, blue, yellow), secondary colors (orange, green, purple), earth tones (such as burnt sienna and raw umber), and a variety of greens and blues for landscapes. Consider buying paints from reputable brands that offer a wide selection of colors.
2. Brushes and Palette Knives:
Choose a variety of brushes suitable for landscape painting, including flat, filbert, and round brushes in different sizes. Synthetic or natural hair brushes can be used, depending on your preference. Additionally, palette knives are useful for applying thick textures and creating interesting effects in your landscape.
3. Canvas or Painting Surface:
Select a canvas or painting surface that is appropriate for oil painting. Stretched canvases are commonly used, but you can also work on canvas boards or linen panels. Consider the size and shape of your canvas based on your desired composition.
4. Mediums and Solvents:
Mediums are used to modify the consistency and drying time of oil paints. Common mediums include linseed oil, stand oil, and painting mediums that offer different characteristics and effects. Solvents like odorless mineral spirits are used for thinning paint and cleaning brushes.
5. Additional Tools and Accessories:
Other essential tools and accessories include a palette for mixing colors, a palette knife for mixing paint, a palette cup for holding solvents, a brush cleaner for maintaining your brushes, and a rag or paper towels for wiping brushes and surfaces.
Preparing the Painting Surface:
Properly preparing the painting surface ensures the longevity and quality of your artwork. Follow these steps:
1. Priming the Canvas:
If you are working on a raw canvas, it’s important to apply a layer of gesso or acrylic primer to seal the fibers and provide a suitable surface for the oil paint. Apply multiple thin layers, allowing each layer to dry before adding the next.
2. Sketching the Composition:
Before applying paint, sketch a basic outline of your composition using a pencil or thin brush. This will help establish the placement of key elements and guide your painting process.
Read Also: How To Create A DIY Home Decor
Understanding Composition and Perspective:
A well-composed landscape painting creates visual interest and draws the viewer’s eye into the scene. Consider the following factors:
1. Selecting a Reference Photo:
Choose a reference photo or paint en plein air (outdoors) to capture the essence of the landscape you want to depict. Pay attention to the composition, lighting, and focal point in the reference to guide your painting.
2. Identifying the Focal Point:
Determine the focal point of your painting—the area that will draw the most attention. It could be a prominent object, a specific area of interest, or a play of light and shadow. Arrange other elements around the focal point to create balance and visual flow.
3. Creating Depth and Distance:
Utilize perspective techniques to create a sense of depth and distance in your landscape. Use overlapping elements, diminishing sizes, and atmospheric perspective (where colors and details become less distinct as they recede into the distance) to give your painting a realistic three-dimensional effect.
Mixing Colors and Creating a Color Palette:
Understanding color theory and creating a harmonious color palette is crucial for realistic and captivating landscape paintings. Consider the following:
1. Basic Color Theory:
Familiarize yourself with color theory principles, such as primary, secondary, and complementary colors, warm and cool colors, and color temperature. This knowledge will help you mix colors effectively and create harmonious combinations.
2. Mixing Primary Colors:
Start with a limited palette of primary colors (red, blue, yellow) and learn to mix a wide range of secondary and tertiary colors. Experiment with different combinations to achieve the desired hues and tones for your landscape. Remember to mix colors on your palette rather than directly on the canvas to maintain control over the process.
3. Creating Harmonious Color Schemes:
Consider the mood and atmosphere you want to convey in your landscape. Harmonious color schemes, such as analogous colors (colors adjacent to each other on the color wheel) or complementary colors (colors opposite each other on the color wheel), can create visual harmony and evoke specific emotions. Experiment with different color combinations to achieve the desired effect.
Blocking in the Underpainting:
The underpainting serves as the foundation for your landscape and helps establish the values, tones, and overall structure of the painting. Follow these steps:
1. Establishing Values and Tones:
Determine the light and dark areas of your landscape and block them in using a monochromatic underpainting. Use a single color or a mix of colors to establish the values and create a sense of depth and contrast.
2. Creating a Base Layer of Color:
Build upon the underpainting by adding thin washes of color to establish the basic elements of your landscape. Use broad brushstrokes to loosely indicate the shapes and forms. Focus on capturing the overall color scheme and the general distribution of lights and darks.
Read Also: How To Create A DIY Home Decor
Building Layers and Adding Details:
Once the underpainting is dry, you can start adding more layers of paint to refine the details and bring your landscape to life. Follow these steps:
1. Layering Techniques:
Apply subsequent layers of paint using a variety of techniques, including glazing, scumbling, and impasto. Glazing involves applying thin, transparent layers of paint to create luminosity and depth. Scumbling involves applying opaque, broken layers of paint to create texture and visual interest. Impasto involves applying thick, textured paint with palette knives or brushes to add dimension and texture.
2. Capturing Light and Shadow:
Observe the lighting conditions in your reference photo or scene and replicate them in your painting. Pay attention to the direction of light, the areas of highlight, mid-tone, and shadow. Gradually build up the layers of paint to capture the play of light and shadow, enhancing the three-dimensional effect.
3. Adding Texture and Depth:
Use various brushstrokes, palette knives, and other tools to create texture and convey different elements of nature, such as foliage, water, or rocks. Experiment with different techniques to achieve the desired textures and effects. Remember to step back and assess your painting from a distance to ensure the overall cohesion and balance of the elements.
Creating Atmosphere and Mood:
To add depth, atmosphere, and mood to your landscape, consider the following techniques:
1. Painting Skies and Clouds:
The sky sets the tone for the entire landscape. Pay attention to the colors, shapes, and movements of the clouds and the overall atmospheric conditions. Utilize techniques like blending, scumbling, or dry brushing to capture the ethereal quality of the sky.How to paint a landscape with oil paints
2. Enhancing Depth with Atmospheric Perspective:
Create the illusion of depth and distance by employing atmospheric perspective. As objects recede into the background, they appear lighter in value, less detailed, and slightly desaturated. Gradually reduce the intensity and saturation of colors as you move towards the horizon, giving your landscape a sense of depth and spatial realism.
3. Incorporating Weather and Lighting Effects:
Consider the weather and lighting conditions in your landscape. Experiment with techniques to depict rain, fog, mist, or the warmth of sunlight. Play with the intensity of colors, the softness or sharpness of edges, and the overall mood to convey the desired weather or lighting effect.
Final Touches and Refinements:
As you near completion, focus on refining the details and making final adjustments to your landscape painting. Consider the following:
1. Refining Details and Highlights:
Add finer details to your painting, such as the intricate textures of leaves, the ripples on water, or the textures of rocks and mountains. Use smaller brushes or palette knives to add these details. Pay attention to highlights and reflections, capturing the play of light on different surfaces to enhance realism.
2. Balancing the Composition:
Step back and assess the overall composition of your painting. Ensure that the elements are balanced, and there is a pleasing visual flow. Make any necessary adjustments to the placement, size, or intensity of certain elements to create a harmonious composition.
3. Sign and Seal Your Artwork:
Once you are satisfied with your landscape painting, sign your name or add your signature to the artwork. This is an important step to claim authorship and complete your masterpiece. Additionally, consider varnishing your artwork to protect it and enhance the colors.
Troubleshooting and Tips:
Here are some additional tips to help you overcome common challenges and enhance your landscape painting with oil:
1. Mixing Colors Accurately:
Practice color mixing regularly to achieve the desired colors and tones. Start with a limited palette and gradually expand your range. Remember to mix colors in small quantities and adjust as needed.
2. Managing Drying Times and Blending:
Oil paints have longer drying times compared to other mediums. Take advantage of this by blending colors on the canvas using brushes or a dry brush technique. Be mindful of drying times to avoid muddiness or unintentional color mixing.
3. Avoiding Common Mistakes:
Avoid overworking your painting by knowing when to stop and step back. Be patient and allow layers to dry before adding more. Take breaks during the painting process to maintain a fresh perspective.
Read Also: How To Sew A Button (Step-By-Step Guide)
Frequently Asked Questions (FAQs):
What are the best brushes for landscape painting?
The best brushes for landscape painting are typically hog bristle brushes, as they provide the stiffness and control needed for applying thick layers of paint and creating texture.
How do I achieve realistic textures in my landscape?
To achieve realistic textures in your landscape, experiment with different brushstrokes, palette knives, and layering techniques. Vary the pressure, direction, and thickness of your application to replicate the textures of foliage, water, or other natural elements.
Can I paint landscapes from imagination or memory?
Yes, painting landscapes from imagination or memory is a valid approach. However, it is helpful to have a solid understanding of landscape elements and reference photos to ensure accuracy and realism in your interpretation.
How do I create the illusion of distance in my painting?
To create the illusion of distance, utilize atmospheric perspective by gradually reducing the intensity and saturation of colors as you move towards the background. Lighten values and reduce detail to make objects appear farther away. Also, scale objects proportionally according to their placement in the landscape.
How can I achieve a sense of harmony in my color palette?
To achieve color harmony, consider using a limited color palette with colors that are either analogous (adjacent on the color wheel) or complementary (opposite on the color wheel). Create a color study or use a color scheme generator to plan your palette before starting your painting.
Read Also: How To Make Homemade Candles (Step By Step)
Conclusion
Painting a landscape with oil paints requires careful observation, understanding of composition, color theory, and techniques to capture the beauty of nature. By following the step-by-step process outlined in this guide and experimenting with different approaches, you can create stunning landscape paintings that evoke emotion, capture the essence of nature, and showcase your artistic abilities. Remember, practice and perseverance are key to mastering landscape painting with oil paints. As you gain experience and explore different techniques, you’ll develop your unique style and approach to capturing the beauty of landscapes on canvas.
Landscape painting allows you to connect with nature, express your creativity, and create visually captivating artworks. It offers a sense of tranquility, exploration, and a way to preserve the beauty of the natural world. Through the use of oil paints, you can achieve depth, texture, and vibrant colors that bring your landscapes to life.
Whether you’re a beginner or an experienced artist, the process of painting a landscape with oil paints is both rewarding and challenging. It requires patience, practice, and a willingness to experiment with different techniques and approaches. By following the steps outlined in this guide, you’ll be well-equipped to embark on your landscape painting journey.
Remember, each landscape is unique, and there are endless possibilities for interpretation and expression. Allow yourself to be inspired by the world around you, whether it’s the grandeur of mountains, the tranquility of a meadow, or the captivating colors of a sunset. Embrace the joy of painting, and let your creativity flow as you bring your landscapes to life with oil paints.
So, gather your materials, select your reference photo, and embark on an artistic adventure as you paint a landscape with oil paints. Immerse yourself in the process, enjoy the journey, and let your creativity soar on the canvas. With dedication, practice, and a love for the natural world, you’ll continue to grow and develop as a landscape artist, capturing the beauty of landscapes for years to come.
Happy painting!


