How To Screenshot On Mac(All You Need To Know)
How To Screenshot On Mac: Most of Apple’s venerable Macs now come in new M1 and M2 variants, although screenshotting is still done in the same way. The process of taking a screenshot on a Mac is not immediately evident to many new Apple users, especially those who are switching from Windows and are accustomed to using the Prt Scrn (Print Screen) button.
Eno
ughInfo.com
The reality is that taking a screenshot on a Mac merely requires hitting a few keys, but traditionally, the process hasn’t seemed very natural. For instance, capturing video of your screen was previously only available using QuickTime Player, and there are various key commands for screenshotting windows as opposed to smaller selections. EnoughInfo.com
Read Also: How To Stop Someone From Mirroring Your Phone(2023)
FAQs & Answers
Where are the screenshots saved on a Mac?
Screenshots are saved on the desktop by default, with the file name “Screen Shot [date] at [time].png”.
How do I change the location where screenshots are saved?
You can change the default location of where screenshots are saved by using the Terminal app and entering the command “defaults write com. apple. screen capture location [path]” where [path] is the desired location. How To Buy Bitcoin On eToro(All You Need To Know)
How do I take a screenshot of a specific window?
Press Command + Shift + 4, then press the Spacebar. The cursor will turn into a camera icon, and you can click on the window you want to capture.
How do I take a screenshot of a menu?
Press Command + Shift + 4, then press and hold the Spacebar. The cursor will turn into a camera icon, and you can click on the menu you want to capture.
Can I annotate my screenshots on a Mac?
Yes, you can use the Preview app to annotate your screenshots. Open the screenshot in Preview, click on the Markup icon, and choose the annotation tools you want to use.
Can I take a screenshot of a video on a Mac?
Yes, you can use the same screenshot shortcuts to capture a still image from a video. However, the quality of the screenshot may be lower than the actual video quality.
Read Also; 185+ Deep Love Messages For Her (Melt Her Heart)
How to screenshot on mac
If you possess a recent Mac, such as a MacBook laptop, an iMac all-in-one computer, a Mac Mini desktop, or a Mac Studio desktop, there are three standard keyboard shortcuts you may use to snap screenshots. Owners of MacBook Pros have a fourth option: the Touch Bar. You also have a good variety of options in Apple’s MacOS program to quickly save, remove, and view the snapshot for annotation. 10 Key Management Skills And How To Improve Them
These guidelines also apply to the most recent Macs, such as the M2 MacBook Air and the recently upgraded 13-inch MacBook Pro with a new M2 processor. These suggestions have been tried and true in MacOS Ventura, the most recent operating system upgrade.
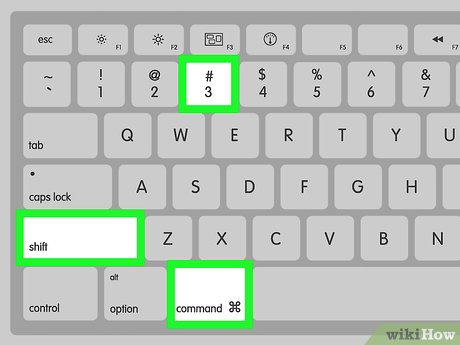
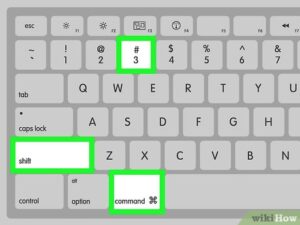
1st Method: Cmd-Shift-3
With the use of this keyboard shortcut, you may screenshot your full screen.
2nd method: Cmd-Shift-4
With the use of this keyboard shortcut, you can transform your cursor into a crosshair that you can drag to choose a specific area of your screen to record. To snap the picture, let go of the mouse or trackpad button.
After pressing Cmd-Shift-4, you have a variety of alternative options, including:
Press and release the spacebar. You may drag the little camera symbol that appears in place of the crosshair over any visible window. To capture a screenshot of the window you want, click on it. This approach produces screenshots with a white border around the window and a faint drop shadow.
Press and hold the spacebar. Before releasing the mouse button or trackpad after dragging to highlight a region: This allows you to move the selection area on the screen while locking in its size and form. If your initial selection region is off by a few pixels, you may easily adjust it by holding down the spacebar before releasing the mouse button to take a screenshot. How To Get Motivated At Work-The guide to professional growth
Hold the Shift key down. Before releasing the mouse button or trackpad after dragging to highlight a region: This secures all sides of the crosshair-made selection area except for the bottom edge, allowing you to set the bottom edge by dragging the mouse up or down.
Reposition the right border of your selection area by releasing the Shift key while continuing to hold down the mouse button. By holding down the Shift key while using the mouse button or touchpad, you may switch between moving the bottom and right edges.
Read Also: How To Freeze Location And Find My Friends
3rd Method: Cmd-Shift-5
Cmd-Shift-5, a keyboard shortcut command, brings up a little panel containing your screen capture choices at the bottom of your display. It was first featured in MacOS Mojave in 2018. You may take a screenshot of your full screen, a window, or a portion of it using one of the three buttons.
Likewise, you may record your full screen or a portion of it using the two video recording buttons. The screenshot panel may be closed using the X button on the left, or you can just use the Escape key to leave.
An options button is located on the right side. It allows you to select the location where your screenshot will be saved (Desktop, Documents, Clipboard, Mail, Messages, Preview, or Other Location), as well as to specify a delay of 5 or 10 seconds so you may line up objects that could otherwise be lost when you use your snapshot tool.
By default, the Show Floating Thumbnail option is selected, which places a little preview thumbnail of the screenshot you just took in the lower-right corner of your screen, much to how you would take a screenshot on an iOS device. You can disable this preview thumbnail on your Mac, but not on your iPhone. Lastly, you have the option of including a snapshot or video of your mouse pointer.
The screenshot panel’s left edge can be grabbed and moved to a different location on your screen if it is blocking your view. How To Be Less Uptight(The Ultimate Guide)
4th Method: Cmd-shift-6 (Bonus for MacBooks with Touch Bar)
You can also capture a screenshot of what is presently shown on the Touch Bar if you have an earlier MacBook Pro with the Touch Bar. To snap an extremely long and slender screenshot of your Touch Bar, simply press Cmd-Shift-6.
Simple annotation
You’ll have easy access to Markup tools to annotate your screenshot if you choose the Floating Thumbnail. It will be stored in the location where you most recently saved a screenshot whether you swipe away the floating thumbnail or just let it disappear on its own. When you click the floating thumbnail, a Markup View preview window (rather than Preview) will appear with all of the markup capabilities available in Preview.
Right-clicking the Floating Thumbnail will allow you to:
- To your desktop, Documents folder, or clipboard, save the captured image.
- Open it in Preview, Mail, Messages, or Photos.
- Display in Finder
- Delete
- Open it in the previously mentioned Markup preview window.
- Close (and save)
The Cmd-Shift-5 shortcut may take some time to catch on with veteran Mac screenshots, but I find that I use it more since it allows me to rapidly remove screenshots that I know I made a mistake on and annotate screenshots without opening Preview. The inclusion of the 5- and 10-second delay options is very beneficial and welcome.
Conclusion
By Following the aforementioned steps you can easily screenshot on mac.
As you can see from the example above, taking a screenshot on a Mac isn’t especially challenging. In fact, it’s now simpler than ever owing to the inclusion of a specific MacBook screenshot and video capture menu in macOS.
The best part is that you may test out all the apps listed here: With a 7-day trial of Setapp, a subscription with 240+ indispensable applications for every work at hand, you can get CleanShot X, Capto, Elmedia Player, Yac, PhotoBulk, and Dropshare for free. You are now prepared to begin your screenshotting game. By Following the aforementioned steps you can easily screenshot on mac.
Read Also: How To Stop Overthinking(The Ultimate Guide)